
Don’t Forget the Door
Ideas for decorating your front porch for the holidays are endless - from rustic to formal to traditional. There is something for everyone.
It’s almost Christmas and I can’t let it go by without a post on the front porch. Although I don’t actually have a post on my front porch to decorate. I did on my last house, lots of them. I had this big covered front porch that extended the length of my house and I could wrap the columns in garland, hang garland and wreaths along the railings, and put out all my decorations. This year I had to be selective and just pick my favorites because my porch is much smaller, but big enough to make it welcoming.
First let’s talk about options. If you don’t really have a porch, or you just want to keep it simple, you could just put a wreath on the front door. Talk about options here - wreaths come in all different varieties, colors, materials, etc. You can go traditional, farmhouse, simple, formal, fancy, glam, plain, lighted, unlighted, or pair it with some garland around the door. Just a little something that cheers up your visitors, the carolers, or even the amazon drivers that will be stopping by every few days during the holidays.


If you want to do more than a wreath, topiaries are a popular decor item. Here is a blog on how to DIY it if this is your style.


Here are some porches decorated with just greenery:


You can go formal:


or rustic:

Saved from crateandbarrel.com
Lanterns are always fun and easy and can be filled with more than just the traditional candle.

Image saved from Pinterest
Here’s a simple and tasteful idea:

Image saved from apartmenttherapy.com
This one has a rustic feel done with wood cutouts:

Image saved from countrydoor.com
Maybe you are lucky enough to have a big front porch with seating. You can change out your decor and pillows to fit the season. The fake snow in this first one is a nice touch I might try since we rarely get a white Christmas.


Whatever your taste there are endless possibilities. Google it, look it up on Pinterest, or just use your imagination. Grab some greenery, ribbon and something wintery and see what you come up with.
This year I just pulled out what I had from the years before - the two small trees I’ve had for literally 20 years, and the sled I got off the side of the road when we lived in Germany 23 years ago on “junking day” when people put there unwanted items out for the trash. I’ve had the wreath longer than I can remember, and the taller tree was on my neighbors curb with a free sign on it. (Hey - I’m not proud - there was nothing wrong with it and better my house than a landfill, right?) I added some ribbon, and picked up the bird house the other day on Hobby Lobby’s 66% off sale and added it to the mix because odd numbers are always better and it helped balance out the bigger, heavier tree on the other side. Now I think I’ll post this and go cut the tag off my birdhouse. I just noticed it in the picture.

My Porch Christmas 2021

Drawing on Inspiration
My 90’s style bathroom gets a simple renovation.
We’ve all been there. Flipping through magazines, searching through Pinterest, surfing the internet, watching TV, walking through someone else’s house, and we see a room that we love, that gives us warm fuzzies, makes us want to live there. I have a Pinterest board called “Beautiful Rooms” where I pin the unattainable. Just breathtaking rooms that are beyond reach that most of us would never be able to afford, or would be totally impractical to live in. Then I have other boards for beautiful rooms that are within reach. Rooms that are attainable. Maybe not exactly, but the idea is attainable. These are my inspiration rooms.
Some rooms just stick with me. I find one and I keep coming back to it. I’m not one to fall for trends. I like some of the trends, I may even incorporate some of them. But I find that if I design a room I love, with classic hard finishes, and colors that I love, I will love it a lot longer.
For example, my favorite color has always been blue. Any blue. Blue gray, blue green, cornflower blue, navy blue… if it’s got blue in it I love it. So, if the trend is blue, I will still love it when the trend is over. When we had a yellow and gray trend a while back, it seemed so fresh and different. If I had jumped on that bandwagon, I would have tired of it pretty quickly.
Another example of a trend that I won’t get tired of is the rustic trend. I love old things and antiques. I loved old stuff long before the farmhouse trend. I have a lot of it mixed in with newer things and finishes. As the farmhouse trend fades out, I will still love my old stuff. But I digress.
When you find a room you love, and you know it’s one that you will love for a long time, why not use it as your inspiration? I found a bathroom a long time ago on Pinterest and it is one of the most beautiful, serene bathrooms I have ever seen. I decided I was going create a similar master bathroom in my new build.

Inspiration Photo Saved from Pinterest
In the house we bought the bathroom vanity looked like this:

Before
This was not at all what I had in mind for my dream house. This was a dream killer. And how could I ever make it remotely like the bathroom I had in mind without spending thousands of dollars? The kitchen remodel, paint, and fence were at the top of my priority list, but until this point I had only had a master bathroom for five years out of the 30 we have been married, and four of those years, it barely qualified. And I had big dreams for my master suite.
I had already bought a double vanity for the house we were going to build, and it just happened to be the right size, so as soon as the bathroom was painted, before we even moved in I had it installed. So even though I couldn’t afford to completely remodel the bathroom, with the new vanity, some paint, lights, and mirrors I was able to come close to my inspiration bathroom and I now have a space I love.
I found some perfect mirrors at Pier 1 Imports and put them on my watch list months before, but then I slacked off and they went on clearance and were gone before I realized they were closing their stores. I cried, and then I searched and found the mirrors from the photo (or some just like them) but they were $500 each and my penny pinching heart just couldn’t do it. Plus, I would spend the rest of my life imagining my grandma during the Great Depression making her children’s clothes from my grandpa’s worn out overalls, every time I looked in them, which is multiple times a day. I found similar mirrors for anywhere between $160 and $600. Then I came across some at Lowes for $75 each that looked almost exactly like some I had seen on Wayfair for three times as much. The mirror is attached to the frame, instead of the frame coming over the mirror, which would be nicer, and if I look closely I can see a couple of minor imperfections in the frame, which would normally bother me because I obsess over little things like that, but it’s a mirror, so when I’m looking at it I’m pretty focused on my own imperfections. This is probably why they are less expensive and I wouldn’t choose them for a client, or a five star hotel, but they are still beautiful and no one sees my master bathroom but me.


Because my space is narrower than the one in the inspiration photo I had to use overhead vanity lights instead of sconces. If you have the space, sconces are actually better for putting on makeup, etc, rather than having the light shining down on you.
I found these gems at Lowe’s also. This was one of those instances when I didn’t wait for a steal. I found the lights I loved, they weren’t overly expensive, I got them for 10% off, and I saved so much on the mirrors, I didn’t feel like scouring the world for a cheaper alternative because they were perfect. The cut glass and little crystals at the top add just a little bit of sparkle. I changed out the satin nickel knobs on my vanity for crystal knobs that echo the shape of the crystals on the lights.

My mirrors and lights are a champagne/antique silver color, which is a warmer tone, so I got satin nickel faucets. Nickel is also a warmer metal. I wanted to go with a timeless white vanity, instead of the blue-gray vanity in the inspiration photo so if I ever decide to change my bathroom color scheme, I can do that. Instead I painted the wall a soft blue-green gray to add that little bit of color and I can always repaint if I get tired of it. Although I don’t see myself doing that anytime soon.
So let’s break this down. $150 for mirrors, $200 for lights, a gallon of paint, and $30 worth of knobs. I already had the vanity, and I can’t even remember where I got it or how much I paid for it. It seems like I got it from a store that was closing down. So about $400 plus the price of a clearance vanity. Oh - and a little help from my friend Beth who arranged my flowers. It doesn’t even look like the same bathroom. Here’s a reminder of what it looked like before, next to a picture of what it looks like now:


Of course if I was starting from scratch I would choose different tile for the floor, and I would have had room for sconces on either side of the mirror. I also chose my paint color to go with some other tile around my bathtub, instead of the bluer gray I wanted, but that’s another post. In the end I’m pretty pleased with how this turned out. It’s not exactly like the picture, but it wasn’t meant to be. I’ve put my own little stamp on it and made it my own little sanctuary.

Good Things Come to Those Who Wait…
10 tips for saving money on your home decorating.
…like this blog post that is now two days late. Now let’s talk cents. Not sense, but that pesky thing we have to worry about every month when the bills come and we have to pay the mortgage and electricity, and then spend the rest on food and diapers when we’d rather be buying cute shoes and other fun stuff. You may look at all the pins you’ve saved on Pinterest, or Houzz, and wish you were independently wealthy so you can execute all the ideas you’ve got floating around in your head and do them right now. But 99% of us aren’t (independently wealthy), so we have to go about it another way.
When my husband and I were fairly newly married and poor as church mice, we lived on an air force base with one child. All the houses in our neighborhood were exactly the same and they were built as temporary housing after WWII. Apparently 1993 was still considered temporary 50 or so years later and those houses were so old and decrepit they actually paid us to live in them. I quit working as a kindergarten teacher when my daughter was born, so we only had one income, but even then I felt a compulsion to beautify my surroundings. I got pretty adept at figuring out how to do things by myself. This was before the internet, so I had to learn from other people or go to the library and actually read books. Now all I have to do is Google it and I can learn how to do anything.
Our living room had a gently used sofa we bought from some friends, a rocking chair my parents bought me when my daughter was born, and an entertainment center that we bought unfinished and assembled and finished ourselves. (We still have the chair and the entertainment center, which has been refurbished a couple of times and used as various things.) We had a strict policy about debt, so if we wanted something we saved for it or waited till we could afford it, or we did without it. This forced me to find creative ways to decorate and still get the things I wanted, but I still managed to have one of the cutest houses in our neighborhood (according to my neighbors) even though we all lived in exactly the same house, on roughly the same income, except we only had one income because I no longer worked.
For example, when we first moved into our house on base, there was no overhead light fixture in the living room so lamps were a necessity. On my limited budget I couldn’t afford the lamps I really wanted (or lamps at all for that matter), so I bought a couple of really cheap ones at a yard sale, because we had to have light, and then I waited. One of the things we started early on in our marriage was that we gave each other an allowance, even if it was just a little bit, that was just for us to spend on things we wanted without having to answer to the other person. It prevented any feelings of guilt if we spent it on something the other person felt was frivolous. I saved a little of my allowance every month toward the lamps and anything else I wanted for decor and then one day I stopped at the store and those lamps were on clearance for 75% off and I had more than enough money saved. I was able to buy the lamps and some fabric from another store to make curtains (which are super easy if you can sew a straight line). I have found over the years that this has happened over and over again. If there is something I want, eventually it goes on sale, I can find a way to get it cheaper or something similar for a lot less, or I can make it myself. I don’t just save a little bit on the things I want, I can usually get them for a fraction of the cost. Today I thought I’d pass on some tips and some of my tricks.
Be patient. We’ve all seen the Wayfair commercial where someone just clicks here and there and over there and an entire, perfect living room is delivered to their door, accessories and all. Unfortunately, most of us can’t afford to do that and we have to do it one step at a time. Keep in mind that it can be a process, and collecting things is half the fun. Just start with a design in mind and then watch and wait.
Work with what you have. When I moved into my new house, I would have loved to do a whole remodel and update the stairs, get rid of the popcorn ceilings, replace the carpet in the bedrooms upstairs, put in a pool, remodel the master bathroom and the kitchen, etc. and buy all new furniture. But, I had just bought a new house and there are expenses that always come along with that, so I had to prioritize and decide what was most important to me. In my case it was a new master bathroom vanity, paint, a fenced backyard and remodel the kitchen. I only had so much money to work with so as far as the kitchen went I decided what was most important on my list and what I could do without and still get the most bang for my buck. That meant keeping the same layout and existing appliances so I could have all new cabinets and countertops. It also meant keeping the existing tile floor since going over the top of it with LVT was not an option in my case and tearing it out would have cost thousands. So to stay within my budget I chose a simple cabinet style so I could have 42” cabinets and a tile backsplash and spend a little more on a statement island. I was also selective about my hardware choices, making sure I got something I liked that was good quality, but wasn’t overly expensive. This also meant I can’t ignore the tile, but have to incorporate it into my color scheme so that it doesn’t jump out at me and scream “I don’t belong here!” Maybe for someone else, a kitchen makeover means painting their existing cabinets instead of getting new ones to save even more money.
Buy it on sale. Like I already said, if there is something you want, just watch it. Most things eventually go on sale. Holidays are always a good excuse for sales. Check the ads on bank holidays, like Memorial day, Labor day, Veteran’s day, and of course Black Friday sales. Just be aware that sometimes, if you don’t watch it closely enough, it goes on clearance and then it’s gone forever. I have several things I want for my house pinned in my Pinterest account, which I check every week or so and watch the prices so that I am aware when any of them go on sale, or if they are about to be discontinued. I also put things in my carts on Wayfair and Overstock so I get an email notification reminding me that it’s there if the price changes, or if they are about to run out.
Shop around. Try scratch and dent, outlet stores, ebay, amazon. Shopping online can be scary since you can’t see it and touch it so read the reviews. Often the reviews can tell you more about the color or the quality. If you find something that you think is a good deal, google it, then look under shopping. You may find the exact same product on another website for less. Just be careful that you check out the website if you aren’t familiar with it. I google websites to make sure they are legitimate if I haven’t heard of them. Sometimes I have to wait a few days longer for things, but I can sometimes save a lot of money that way. Look for coupon codes on the internet, sometimes you can find even more percentages off of certain websites. I shopped high and low for the perfect coffee table until I found one I loved for my living room. The catch was that I didn’t want to spend $799 right then because I had other priorities, so I was willing to do without until I either had the money to spend or I found it cheaper somewhere else. One day I got a notification from Wayfair that I was about to miss out because it had gone on sale for $551 and was almost gone, so I googled it and it was on sale everywhere else too. I was able to find it somewhere else for $492, plus that website had a 10% off coupon, bringing it down to $442, a whole $357 off the original price.

My $800 marble coffee table I got for $442. It was worth the wait.
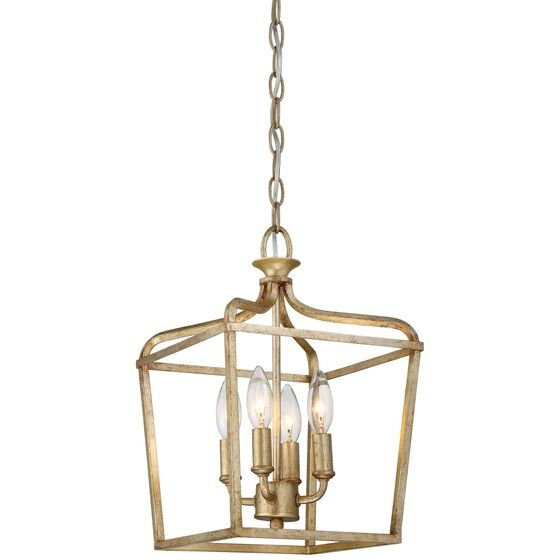
5. If you find something you really like, but it is way out of your price range, find something similar to achieve the same look. Some things you can make do with a cheaper version and no one will be the wiser, or even care. One trick I’ve learned is that if I pin something on Pinterest and then click on it, below it there will be a whole slew of similar products that pop up, and I can usually find something that comes close for a lot less money. When I started remodeling my kitchen, I found some Feiss Thayer pendant lights that were perfect for my island, except that I didn’t want to kill my budget and spend $340 for each of them. I pinned them on Pinterest and found some similar ones made by Minka Lavery that I was able to get with a 20% off coupon code from 1800Lighting for about half as much. I didn’t like them quite as much, but they were nice enough for the money, and they look great in my new kitchen.

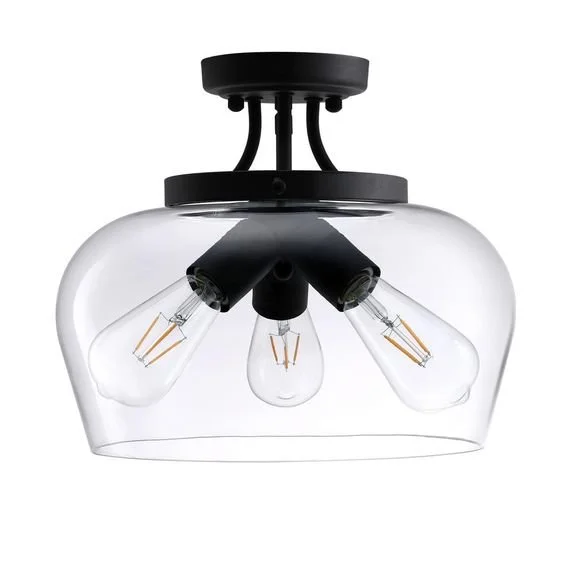
On the other hand I wanted a schoolhouse style light for my laundry room. Most of them only have one bulb, which wasn’t enough, and the one I found was $225, by Birch Lane and way more than I wanted to spend on my laundry room. The alternative I found was only $80 at Home Depot and is almost just like it, except it isnt. The bulbs are at an odd angle and the proportions just don’t look quite right to me. The one I wanted is dark bronze and the alternate is black. Just little things that I decided would have to do because it is just the laundry room after all. The ballast on my old fluorescent light was going out which forced me replace the fixture a few weeks ago and it just so happened that the light I really wanted happened to be on sale for $113. I was willing to pay $33 more for the nicer light, but not $140 more.

6. DIY or Recycle. I saved hundreds, maybe thousands and still got what I wanted by painting my own baseboards and stair moldings. Is it something you can make yourself for less, or buy a simpler version and fix it up? One of my friends fell in love with a $5000 modern light fixture she wanted for her new dining room, so she bought a much cheaper, simple fixture and ordered some crystals from Brazil and created her own for $400. I did the same thing with a ceiling fan I wanted for my French Country bedroom. The antiqued fan with a mini chandelier I wanted was $600. Instead I bought a cheaper off-white fan, antiqued it myself and bought a mini chandelier light kit, all for $180. Maybe you have something already that you can recycle with a little paint. Remember my first entertainment center? It held our tv for years, then I painted it black, replaced the knobs, and it became a wardrobe for a teenage girl’s bedroom. At one point I cut the panels out of the doors and put curtains behind them. Now it’s in my teenage son’s room, where I industrialized it by replacing the curtains with decorative sheet metal from Home Depot.

The cabinet with 9 lives. It started out as Country Pine 30 years ago. Please ignore my son’s stuff stacked on and around it. He happens to be living in Brazil at the moment. Maybe he can get me some crystals.
7. Learn some new skills. You can learn to do almost anything on YouTube in this day and age. Thirteen years ago I wanted a tile backsplash but couldn’t afford the $1000 it was going to cost for the tile and installation. So I learned how to do it online, rented a tile saw and with my husband’s help we installed it ourselves for $180. Learn how to sew straight lines on a sewing machine. Over time you will save thousands making your own custom drapes and throw pillows, and do your research to find home decor fabric online for less.
8. Have a wish list, either in the back of your mind or write it down somewhere. Then when you come across a fantastic deal on something on your list, buy it while it’s a deal. I like to go to yard sales and flea markets, but I have one rule I like to stick to. I only buy something if it’s on my wish list. That way I don’t end up with a garage full of junk I don’t need, or projects I’m never going to finish. Recently I came across a set of 8 solid wood ladder back dining chairs in excellent condition at a yard sale for $150. They just need new upholstery fabric because I don’t like the fabric and I want to paint them because I don’t like the color. I’ve wanted ladder back chairs for a couple years now, but didn’t want to pay $200-300 a piece for them, so they were in the back of my mind as something I would buy one day. In the meantime, I had cheap chairs as place holders until I could afford them. Now for $150, a can of paint, and some fabric I already have stashed away somewhere, I will have a whole new set of good quality, gorgeous chairs because I was willing to wait.

One of my chairs waiting to be refinished. When I get them done I’ll post an “after” shot.
9. Trade with a friend. I know how to sew, I have a friend who does floral design. I sew curtains for her, she helps me with floral arrangements. It’s a win-win.
10. Last but not least - NEVER pay full price for anything. Everything goes on sale eventually. Ok, almost everything. Maybe I already mentioned this one. I probably did. But it’s worth mentioning again. Just wait for it.
Here are a few more of my steals:

An end table I found at a yard sale recently for $15, on it is one of a set of lamps I got on clearance for $20 each. I just need to put a protective finish on the table.

A yard sale mirror I got for $5 twenty years ago. It used to be aged brass. I recycled it by painting it a more updated matte gold color with a $1.25 bottle of acrylic paint, then I turned it sideways.

Accent chairs I got from Pier 1 Imports on clearance when they sold all their inventory and closed their stores last year.

An antique cane chair from a yard sale for $10

Another $5 chair from a yard sale. (And a free cat from my sister.) Obviously the people at the yard sale didn’t realize what a super cool distressed chair this was, and my sister didn’t know what a super cool cat that kitten would become or they wouldn’t have let them go so cheaply. I put this at my kids computer desk. (The chair, not the cat.)

Lastly, a $2500 Serta sectional I got at an outlet store for $480. (Yes, I do know that the room it is currently in has not been put together yet and there are packing boxes and mattresses in the background, but this was such a steal I had to swallow my pride and show you anyway.)
As I finish up this post, which is late because I have been quite busy the last few days, I’ve been thinking. One of the things I have been doing is gathering up some clothes for some children of a Romanian family I recently befriended who are living with relatives and basically have nothing. It kind of makes me rethink my life and all of this concern over light fixtures and tile floors. I’ve decided I’m grateful for my popcorn ceilings. At least I have ceilings. And lights. And floors.

Why Decorate When No One Else Sees?
Today I’m going to share with you a little hallway that comes in from my garage. But first I have to whine. Just a little bit. Due to the fact that I have never had a mudroom, or even a decent back entrance, my six kids have spent their lives coming in through the front door and dropping everything right there - by the door, or in my living room, or on the stairs - depending on where we lived. I would nag at them to put it all away and because they weren’t afraid of me or my nagging, we would have piles of shoes, because of course they never wore the same shoes twice in a row, or put the ones from yesterday or last week away in their closets, and it was a constant irritation. (I have a friend who can just look at her kids and they hop right to it or stop whatever it is they are doing. I was not blessed with that motherly gift and if I tried to give my kids a “look” they would laugh at me.)
I tried in our last house having them come through the garage, and I set up little cubbies for them and it worked for a little while, but because we didn’t have a lot of storage space in the house, the garage became that place and so they had a hard time navigating their way through the obstacle course that was our garage and soon started using the front door anyway. I was going to solve this in our new build by having an awesome mudroom with its own front entrance with little cubbies for their backpacks and shelves for their shoes, but since I didn’t get to build after all, I now have a side entrance into my laundry room with room for some hooks and a bench. But I also have lots of storage in this house and a detached garage for my husbands projects, so we actually get to park in the attached garage, so those little cubbies are actually accessible just before they come in the house from the car.
So just inside the door from my garage I have this little hallway with a closet. It’s a perfect place to hang our keys and to put a bench where we can sit to put on our shoes. Between the side entrance and the garage, we never come in the front door and I never have shoes and backpacks in my living room. Happy day! I came across a blog post that I had saved a while ago where someone had done a super cute entrance and the idea was perfect for this hall.

Inspiration from mindfullygray.com
I fell in love with the color I painted my upstairs bathroom and decided to use it again for the lower half of the wall. Of course I painted all my wood trim white like the rest of the house. Then I stained a 1x6 to match my closet doors and hung it with some hooks for jackets and purses.
About 20 years ago we lived in a house in Germany with a big picture window that looked out onto a field with some fruit trees and hills in the background. It was gorgeous in every season, with the flowering trees in the spring, the fall foliage, and then the sparkling ice hanging from the tree branches in winter. I have pictures from that window from all four seasons and I’ve always wanted to do something with them so I framed them and hung them above the hooks. They aren’t professional photographs by any means, and they are from the days before digital when you took a picture and then six months later took your film in to be developed and crossed your fingers that some of the pictures turned out ok, but they are meaningful to us and they are hanging in a back hallway so they work here. In one of them my two oldest girls are standing in the field when they were little, which makes it even more nostalgic.

Here you can see my “four seasons” photographs. It’s a narrow space so it was hard to get a good view. I also found a rustic bench and I used dark bronze coat and key hooks.


I decided to go a little more rustic here since this is a back entry into the garage. I took down the old generic light fixture and added a dark bronze lantern to match the finish on the hooks. It just felt like a great place for a lantern. My lower wall is Benjamin Moore’s Dartsmouth Green 691, and the rest of the walls are Ballet White OC-9. Ballet White is a light beige with a green undertone and a high LRV so it brightens things up and goes really well with all the green in this room. This may not be a highly visible room in my house, but it’s now a little bright spot that brings some joy as I come and go throughout my day.