
Don’t Forget the Door
Ideas for decorating your front porch for the holidays are endless - from rustic to formal to traditional. There is something for everyone.
It’s almost Christmas and I can’t let it go by without a post on the front porch. Although I don’t actually have a post on my front porch to decorate. I did on my last house, lots of them. I had this big covered front porch that extended the length of my house and I could wrap the columns in garland, hang garland and wreaths along the railings, and put out all my decorations. This year I had to be selective and just pick my favorites because my porch is much smaller, but big enough to make it welcoming.
First let’s talk about options. If you don’t really have a porch, or you just want to keep it simple, you could just put a wreath on the front door. Talk about options here - wreaths come in all different varieties, colors, materials, etc. You can go traditional, farmhouse, simple, formal, fancy, glam, plain, lighted, unlighted, or pair it with some garland around the door. Just a little something that cheers up your visitors, the carolers, or even the amazon drivers that will be stopping by every few days during the holidays.


If you want to do more than a wreath, topiaries are a popular decor item. Here is a blog on how to DIY it if this is your style.


Here are some porches decorated with just greenery:


You can go formal:


or rustic:

Saved from crateandbarrel.com
Lanterns are always fun and easy and can be filled with more than just the traditional candle.

Image saved from Pinterest
Here’s a simple and tasteful idea:

Image saved from apartmenttherapy.com
This one has a rustic feel done with wood cutouts:

Image saved from countrydoor.com
Maybe you are lucky enough to have a big front porch with seating. You can change out your decor and pillows to fit the season. The fake snow in this first one is a nice touch I might try since we rarely get a white Christmas.


Whatever your taste there are endless possibilities. Google it, look it up on Pinterest, or just use your imagination. Grab some greenery, ribbon and something wintery and see what you come up with.
This year I just pulled out what I had from the years before - the two small trees I’ve had for literally 20 years, and the sled I got off the side of the road when we lived in Germany 23 years ago on “junking day” when people put there unwanted items out for the trash. I’ve had the wreath longer than I can remember, and the taller tree was on my neighbors curb with a free sign on it. (Hey - I’m not proud - there was nothing wrong with it and better my house than a landfill, right?) I added some ribbon, and picked up the bird house the other day on Hobby Lobby’s 66% off sale and added it to the mix because odd numbers are always better and it helped balance out the bigger, heavier tree on the other side. Now I think I’ll post this and go cut the tag off my birdhouse. I just noticed it in the picture.

My Porch Christmas 2021

Wrapping it Up
Ribbon isn’t just for Christmas trees. It is an inexpensive and easy way to decorate all over your house.
It’s the most wonderful and the busiest time of the year. If I have to go to one more Christmas concert, Christmas party, or Christmas parade I’ll go nuts. I’d just like to decorate my house and yard and stay home listening to Christmas music while I bake goodies for my neighbors and wrap presents for a change.
Speaking of wrapping, this year I thought I’d be all fancy and match my packages to my designer tree. Ha! I found a roll of silver and white paper and a roll of blush (not pink) paper with some subtle glitter on it that matched my tree decorations and bought some fancy ribbons and started wrapping. I learned a couple of things. First, I learned that just because they sell it doesn’t mean it’s a good idea. I couldn’t get my tape to stick to my glittery paper, so I tried packing tape and it still didn’t work. Second, I learned that all those pretty ribbons used to have a purpose - tying packages shut before the invention of tape. Third I learned that taping a present shut is a lot faster and more efficient than tying it shut. Fourth, I learned that I don’t have the patience for this and next year everything goes in gift bags. It’s greener anyway. They are reusable and I save some trees.
Last post I talked about using ribbon and picks to decorate your tree. This post I’ll just wrap this up and talk about how to use ribbon and picks in other places. I put some garland on my banister and then dressed it up with some ribbon, just tucking it in here and there, then tucked in some poinsettia picks. Easy peasy. Took me a matter of minutes. Those branches hold it tight.

Then I decided that my garland on my fireplace was lacking something so I added some of the same ribbon and poinsettias to the garland on my fireplace. It was just what it needed. (Santa needed a poinsettia too.)

Finally, after all that, my coffee table looked a little out of place and I needed a place to display the crystal nativity I got while I lived in Germany so I put it there with some Ivy and candles and of course a poinsettia pick.

Of course my kids insisted I display my Santa collection, my other nativities and my advent calendars in my family room. I guess as long as I have kids I’ll have to put out the advent calendars. Now I can just relax and enjoy the season. Except for those pesky parties.

Oh Christmas Tree…
When it comes to Christmas traditions and decorating for Christmas, the Christmas tree is the first thing I think of. If I do nothing else, we have to have a Christmas tree. One year we arrived in Germany the end of November and we were in temporary housing for Christmas, but we made sure we had a little tabletop tree with mini decorations, because it just isn’t Christmas without a tree. Another year my kids had a big mess in their playroom blocking the entrance to the attic and being the brilliant mom that I am I told them I wasn’t going to get out the tree unless they cleaned it up, thinking I was a genius and that was the only incentive they needed. When they didn’t meet the deadline (as in didn’t do it at all), I then had to be the good mom that follows through with consequences and I didn’t get the tree out. However – it still wasn’t Christmas without a tree so I had a small tree on my front porch that I brought in on Christmas eve to put the presents under. I’m a good mom, not a total Grinch.
I grew up with mountains and my family would bundle up and trek up into the mountains and my dad would cut down a tree and drag it down the mountain. Our first Christmas together we lived in Cheyenne, Wyoming where it’s something like 140 below in December and the wind blows 24/7 which makes it feel even colder and if you step outside your nose instantly freezes into solid ice. But it was our first Christmas and I had to have a real tree so we went to a tree lot to pick out a tree. The wind was bitter cold and because I’m a perfectionist there was something wrong with every tree we looked at. My poor husband had finally had enough and told me he was going home if I didn’t soon make a decision, so in a huff I just grabbed a tree and we took it home. That poor tree had a large branch that took a sharp 60 degree turn about halfway up and not matter how much sawing and cutting he did, he could not make that tree stand up. (All of this he had to do in our little apartment with a hacksaw, by the way.) That was our last real tree. He finally gave up and told me I could have any artificial tree in the store I wanted. I picked out a really nice one, except - do you remember when you had to put each branch individually on an artificial tree and add your own lights? Yeah – it was one of those.
The next year we lived on base and we got out our 7 1/2ft Christmas tree and it was too tall for our 7’ ceilings. We traded it for a car and then bought a shorter one which we used for several years until we bought a lighted one that came in 3 pieces instead 125. Over the years we’ve had toddlers and tabletop trees, kittens and shatterproof ornaments, trees with no ornaments on the bottom 1/3 of the tree, and one year we had a fence around it – whatever it takes to have babies and still have a tree.
This year, I have no toddlers, no kittens, and I have vaulted ceilings. I can have a 9 foot tree for the first time ever. One of my kids asked me why I wanted a tree that tall and I told them “duh! Because I can.” Last year I priced 9ft trees and nearly choked. Then I waited. One day in January I was walking through the store and there was a 9ft tree for 75% off. This made it $100, plus I got a 10% military discount, which made it $90. It barely fit in my car, but I snapped that baby up and brought it home.
We plan to have Christmas by the fireplace downstairs, so I’m putting up my smaller tree with all of our traditional ornaments down there, so I decided I wanted a designer tree that matches my room for my tall tree. I decided to go with a blush, white, and silvery blue-green color scheme. The problem was coming up with enough decorations for a tree that tall without breaking the bank. The solution? Ribbon. I started collecting ornaments as soon as Hobby Lobby put out their Christmas stuff a few at a time. I bought 36 balls – 18 large ones for the bottom of the tree and 18 smaller ones for the top, 24 other ornaments in 2 different shapes and colors, and 24 snowflakes. To fill in the gaps I bought wire-edged ribbon and picks. The picks give it dimension, and ribbon can do the same thing, depending on how you use it.

What I wasn’t prepared for was how long it would take climb up and down a ladder umpteen times to wrap all that ribbon and put on the decorations at the top! Below I have posted links to two videos showing how to use ribbon on a tree several different ways. I did three types here. The blue-green ribbon I used as garland and wrapped it around the tree. Then I hung the iridescent mesh ribbon loosely in a cascade vertically to add dimension. After I put on the ornaments and some blue-green picks I used the blush (not pink - I hate pink) ribbon curls to fill in any blank spots.
You can find the first video here: 5 Ways to Hang Ribbon on a Tree
And the second one is here: 4 Easy Ribbon Tutorials
Just watch your step or you could fall down a rabbit hole of hundreds of ribbon and tree decorating tutorials. I watched one where someone had 4 trees in their house, all with different themes and apparently they change the themes every year. I feel lucky to get one tree up the day after Thanksgiving and hope to get my traditional tree up downstairs in time for Christmas. And don’t expect next year’s tree to look much different than this year’s. Why improve on perfection? Unless…
I find a fantastic deal after Christmas on a flocked tree, and then I will sell this one in a heartbeat. The flocked trees today are not the flocked trees I remember from the 70’s. So start decorating that tree and get some ribbon to go with it.

It’s the Most Wonderful Time of the Year
Style your fireplace mantel for Christmas
It’s that time of year again. Time to drag the tree out of the basement and the yard decorations out of the attic. Didn’t I just put them away last month? Since Christmas is almost upon us, I thought I would focus the next couple of weeks on some fun Christmas decor.
This year I get to do something I’ve never been able to do before - decorate my mantel for Christmas. I had a fireplace one other time, but it was in the basement, and I did do a little something, but what’s the fun in decorating something that I only see when on my way to the dungeon to do laundry? So this is what I came up with this year:

My Fireplace Mantel Decor - Christmas 2021
I accidentally came across the print by Beverly Gurganus a couple of years ago and fell in love with it so I bought it and it’s been packed away in a closet ever since. Then I was in Hobby Lobby a few weeks ago and they had the canvas for $20 and it’s like they were made for each other. A leafy garland, throw in some gold and pearl picks, add a couple pine cones and some gold candlesticks for balance and it’s a mantel fit for a king - pun intended. Oh, and if you zoom in you can see the little wooden sign by the candles that I got for $2 at a yard sale this summer, which also just happens to go perfectly with everything else.
As for the other garland, I’ll let you all in on a secret. This is two 9’ pieces of lighted garland I got from Hobby Lobby for $10 each. Now, I could have spent $30-$40 each on 3 6ft lengths with pine cones and berries already attached, but they wouldn’t have had lights and I would have spent a lot more money. By buying the cheaper garland and then spending another $10 or so on some picks that I then added to the garland I got the whole thing for around $30 and I was able to customize it. If I want to add something different to it next year, I can give it a whole new look for just a few dollars. The trees I’ve had for decades. I’ve really wanted some lanterns for my fireplace but I have yet to find some I love that I want to pay for, so in the meantime, the trees are filling that spot. Maybe by next year I will have lanterns to put there.
Now for fun, let’s look at some other Christmas mantel ideas. Maybe you’ll be inspired. Here’s a Glam style mantel:
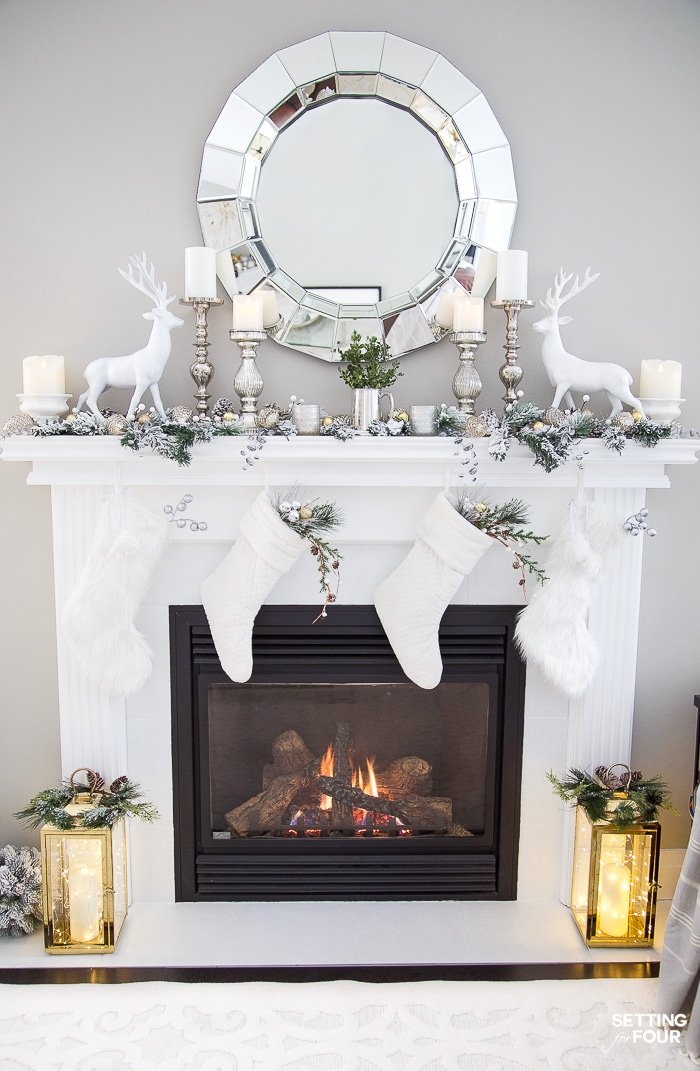
Image found on www.settingforfour.com
And here’s one that’s Farmhouse style:

Image found on www.wilshirecollections.com
Are you looking for something simple and more modern? I love this asymmetrical one:
Image found at https//mirandaschroeder.com
Maybe Coastal is more your style? Wouldn’t we all like to spend Christmas at the beach?
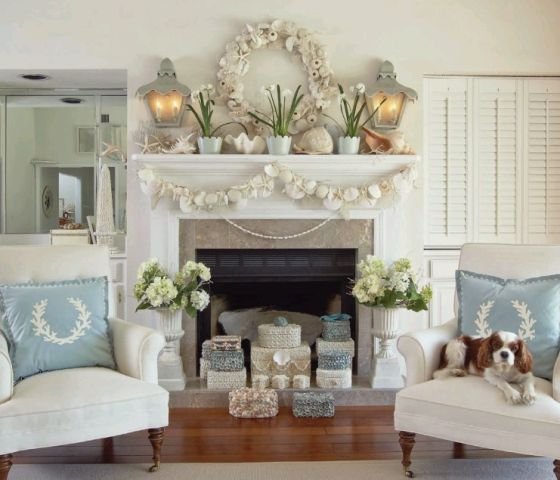
Image found at www.sandandsisal.com
Or you just want to go traditional red and green. Here’s a really cute idea:

Image found on www.grandinroad.com
Maybe you want something a little different and non-traditional. Here’s an affordable, simple idea that uses eucalyptus garland:

Image found on Pinterest
No matter what your style, there are hundreds of ideas out there. Just search on Pinterest and you’ll find plenty of inspiration. And next to a Christmas tree, there’s nothing cozier than a fireplace decorated for the holidays. Happy Decorating!

Drawing on Inspiration
My 90’s style bathroom gets a simple renovation.
We’ve all been there. Flipping through magazines, searching through Pinterest, surfing the internet, watching TV, walking through someone else’s house, and we see a room that we love, that gives us warm fuzzies, makes us want to live there. I have a Pinterest board called “Beautiful Rooms” where I pin the unattainable. Just breathtaking rooms that are beyond reach that most of us would never be able to afford, or would be totally impractical to live in. Then I have other boards for beautiful rooms that are within reach. Rooms that are attainable. Maybe not exactly, but the idea is attainable. These are my inspiration rooms.
Some rooms just stick with me. I find one and I keep coming back to it. I’m not one to fall for trends. I like some of the trends, I may even incorporate some of them. But I find that if I design a room I love, with classic hard finishes, and colors that I love, I will love it a lot longer.
For example, my favorite color has always been blue. Any blue. Blue gray, blue green, cornflower blue, navy blue… if it’s got blue in it I love it. So, if the trend is blue, I will still love it when the trend is over. When we had a yellow and gray trend a while back, it seemed so fresh and different. If I had jumped on that bandwagon, I would have tired of it pretty quickly.
Another example of a trend that I won’t get tired of is the rustic trend. I love old things and antiques. I loved old stuff long before the farmhouse trend. I have a lot of it mixed in with newer things and finishes. As the farmhouse trend fades out, I will still love my old stuff. But I digress.
When you find a room you love, and you know it’s one that you will love for a long time, why not use it as your inspiration? I found a bathroom a long time ago on Pinterest and it is one of the most beautiful, serene bathrooms I have ever seen. I decided I was going create a similar master bathroom in my new build.

Inspiration Photo Saved from Pinterest
In the house we bought the bathroom vanity looked like this:

Before
This was not at all what I had in mind for my dream house. This was a dream killer. And how could I ever make it remotely like the bathroom I had in mind without spending thousands of dollars? The kitchen remodel, paint, and fence were at the top of my priority list, but until this point I had only had a master bathroom for five years out of the 30 we have been married, and four of those years, it barely qualified. And I had big dreams for my master suite.
I had already bought a double vanity for the house we were going to build, and it just happened to be the right size, so as soon as the bathroom was painted, before we even moved in I had it installed. So even though I couldn’t afford to completely remodel the bathroom, with the new vanity, some paint, lights, and mirrors I was able to come close to my inspiration bathroom and I now have a space I love.
I found some perfect mirrors at Pier 1 Imports and put them on my watch list months before, but then I slacked off and they went on clearance and were gone before I realized they were closing their stores. I cried, and then I searched and found the mirrors from the photo (or some just like them) but they were $500 each and my penny pinching heart just couldn’t do it. Plus, I would spend the rest of my life imagining my grandma during the Great Depression making her children’s clothes from my grandpa’s worn out overalls, every time I looked in them, which is multiple times a day. I found similar mirrors for anywhere between $160 and $600. Then I came across some at Lowes for $75 each that looked almost exactly like some I had seen on Wayfair for three times as much. The mirror is attached to the frame, instead of the frame coming over the mirror, which would be nicer, and if I look closely I can see a couple of minor imperfections in the frame, which would normally bother me because I obsess over little things like that, but it’s a mirror, so when I’m looking at it I’m pretty focused on my own imperfections. This is probably why they are less expensive and I wouldn’t choose them for a client, or a five star hotel, but they are still beautiful and no one sees my master bathroom but me.


Because my space is narrower than the one in the inspiration photo I had to use overhead vanity lights instead of sconces. If you have the space, sconces are actually better for putting on makeup, etc, rather than having the light shining down on you.
I found these gems at Lowe’s also. This was one of those instances when I didn’t wait for a steal. I found the lights I loved, they weren’t overly expensive, I got them for 10% off, and I saved so much on the mirrors, I didn’t feel like scouring the world for a cheaper alternative because they were perfect. The cut glass and little crystals at the top add just a little bit of sparkle. I changed out the satin nickel knobs on my vanity for crystal knobs that echo the shape of the crystals on the lights.

My mirrors and lights are a champagne/antique silver color, which is a warmer tone, so I got satin nickel faucets. Nickel is also a warmer metal. I wanted to go with a timeless white vanity, instead of the blue-gray vanity in the inspiration photo so if I ever decide to change my bathroom color scheme, I can do that. Instead I painted the wall a soft blue-green gray to add that little bit of color and I can always repaint if I get tired of it. Although I don’t see myself doing that anytime soon.
So let’s break this down. $150 for mirrors, $200 for lights, a gallon of paint, and $30 worth of knobs. I already had the vanity, and I can’t even remember where I got it or how much I paid for it. It seems like I got it from a store that was closing down. So about $400 plus the price of a clearance vanity. Oh - and a little help from my friend Beth who arranged my flowers. It doesn’t even look like the same bathroom. Here’s a reminder of what it looked like before, next to a picture of what it looks like now:


Of course if I was starting from scratch I would choose different tile for the floor, and I would have had room for sconces on either side of the mirror. I also chose my paint color to go with some other tile around my bathtub, instead of the bluer gray I wanted, but that’s another post. In the end I’m pretty pleased with how this turned out. It’s not exactly like the picture, but it wasn’t meant to be. I’ve put my own little stamp on it and made it my own little sanctuary.

Good Things Come to Those Who Wait…
10 tips for saving money on your home decorating.
…like this blog post that is now two days late. Now let’s talk cents. Not sense, but that pesky thing we have to worry about every month when the bills come and we have to pay the mortgage and electricity, and then spend the rest on food and diapers when we’d rather be buying cute shoes and other fun stuff. You may look at all the pins you’ve saved on Pinterest, or Houzz, and wish you were independently wealthy so you can execute all the ideas you’ve got floating around in your head and do them right now. But 99% of us aren’t (independently wealthy), so we have to go about it another way.
When my husband and I were fairly newly married and poor as church mice, we lived on an air force base with one child. All the houses in our neighborhood were exactly the same and they were built as temporary housing after WWII. Apparently 1993 was still considered temporary 50 or so years later and those houses were so old and decrepit they actually paid us to live in them. I quit working as a kindergarten teacher when my daughter was born, so we only had one income, but even then I felt a compulsion to beautify my surroundings. I got pretty adept at figuring out how to do things by myself. This was before the internet, so I had to learn from other people or go to the library and actually read books. Now all I have to do is Google it and I can learn how to do anything.
Our living room had a gently used sofa we bought from some friends, a rocking chair my parents bought me when my daughter was born, and an entertainment center that we bought unfinished and assembled and finished ourselves. (We still have the chair and the entertainment center, which has been refurbished a couple of times and used as various things.) We had a strict policy about debt, so if we wanted something we saved for it or waited till we could afford it, or we did without it. This forced me to find creative ways to decorate and still get the things I wanted, but I still managed to have one of the cutest houses in our neighborhood (according to my neighbors) even though we all lived in exactly the same house, on roughly the same income, except we only had one income because I no longer worked.
For example, when we first moved into our house on base, there was no overhead light fixture in the living room so lamps were a necessity. On my limited budget I couldn’t afford the lamps I really wanted (or lamps at all for that matter), so I bought a couple of really cheap ones at a yard sale, because we had to have light, and then I waited. One of the things we started early on in our marriage was that we gave each other an allowance, even if it was just a little bit, that was just for us to spend on things we wanted without having to answer to the other person. It prevented any feelings of guilt if we spent it on something the other person felt was frivolous. I saved a little of my allowance every month toward the lamps and anything else I wanted for decor and then one day I stopped at the store and those lamps were on clearance for 75% off and I had more than enough money saved. I was able to buy the lamps and some fabric from another store to make curtains (which are super easy if you can sew a straight line). I have found over the years that this has happened over and over again. If there is something I want, eventually it goes on sale, I can find a way to get it cheaper or something similar for a lot less, or I can make it myself. I don’t just save a little bit on the things I want, I can usually get them for a fraction of the cost. Today I thought I’d pass on some tips and some of my tricks.
Be patient. We’ve all seen the Wayfair commercial where someone just clicks here and there and over there and an entire, perfect living room is delivered to their door, accessories and all. Unfortunately, most of us can’t afford to do that and we have to do it one step at a time. Keep in mind that it can be a process, and collecting things is half the fun. Just start with a design in mind and then watch and wait.
Work with what you have. When I moved into my new house, I would have loved to do a whole remodel and update the stairs, get rid of the popcorn ceilings, replace the carpet in the bedrooms upstairs, put in a pool, remodel the master bathroom and the kitchen, etc. and buy all new furniture. But, I had just bought a new house and there are expenses that always come along with that, so I had to prioritize and decide what was most important to me. In my case it was a new master bathroom vanity, paint, a fenced backyard and remodel the kitchen. I only had so much money to work with so as far as the kitchen went I decided what was most important on my list and what I could do without and still get the most bang for my buck. That meant keeping the same layout and existing appliances so I could have all new cabinets and countertops. It also meant keeping the existing tile floor since going over the top of it with LVT was not an option in my case and tearing it out would have cost thousands. So to stay within my budget I chose a simple cabinet style so I could have 42” cabinets and a tile backsplash and spend a little more on a statement island. I was also selective about my hardware choices, making sure I got something I liked that was good quality, but wasn’t overly expensive. This also meant I can’t ignore the tile, but have to incorporate it into my color scheme so that it doesn’t jump out at me and scream “I don’t belong here!” Maybe for someone else, a kitchen makeover means painting their existing cabinets instead of getting new ones to save even more money.
Buy it on sale. Like I already said, if there is something you want, just watch it. Most things eventually go on sale. Holidays are always a good excuse for sales. Check the ads on bank holidays, like Memorial day, Labor day, Veteran’s day, and of course Black Friday sales. Just be aware that sometimes, if you don’t watch it closely enough, it goes on clearance and then it’s gone forever. I have several things I want for my house pinned in my Pinterest account, which I check every week or so and watch the prices so that I am aware when any of them go on sale, or if they are about to be discontinued. I also put things in my carts on Wayfair and Overstock so I get an email notification reminding me that it’s there if the price changes, or if they are about to run out.
Shop around. Try scratch and dent, outlet stores, ebay, amazon. Shopping online can be scary since you can’t see it and touch it so read the reviews. Often the reviews can tell you more about the color or the quality. If you find something that you think is a good deal, google it, then look under shopping. You may find the exact same product on another website for less. Just be careful that you check out the website if you aren’t familiar with it. I google websites to make sure they are legitimate if I haven’t heard of them. Sometimes I have to wait a few days longer for things, but I can sometimes save a lot of money that way. Look for coupon codes on the internet, sometimes you can find even more percentages off of certain websites. I shopped high and low for the perfect coffee table until I found one I loved for my living room. The catch was that I didn’t want to spend $799 right then because I had other priorities, so I was willing to do without until I either had the money to spend or I found it cheaper somewhere else. One day I got a notification from Wayfair that I was about to miss out because it had gone on sale for $551 and was almost gone, so I googled it and it was on sale everywhere else too. I was able to find it somewhere else for $492, plus that website had a 10% off coupon, bringing it down to $442, a whole $357 off the original price.

My $800 marble coffee table I got for $442. It was worth the wait.
5. If you find something you really like, but it is way out of your price range, find something similar to achieve the same look. Some things you can make do with a cheaper version and no one will be the wiser, or even care. One trick I’ve learned is that if I pin something on Pinterest and then click on it, below it there will be a whole slew of similar products that pop up, and I can usually find something that comes close for a lot less money. When I started remodeling my kitchen, I found some Feiss Thayer pendant lights that were perfect for my island, except that I didn’t want to kill my budget and spend $340 for each of them. I pinned them on Pinterest and found some similar ones made by Minka Lavery that I was able to get with a 20% off coupon code from 1800Lighting for about half as much. I didn’t like them quite as much, but they were nice enough for the money, and they look great in my new kitchen.

On the other hand I wanted a schoolhouse style light for my laundry room. Most of them only have one bulb, which wasn’t enough, and the one I found was $225, by Birch Lane and way more than I wanted to spend on my laundry room. The alternative I found was only $80 at Home Depot and is almost just like it, except it isnt. The bulbs are at an odd angle and the proportions just don’t look quite right to me. The one I wanted is dark bronze and the alternate is black. Just little things that I decided would have to do because it is just the laundry room after all. The ballast on my old fluorescent light was going out which forced me replace the fixture a few weeks ago and it just so happened that the light I really wanted happened to be on sale for $113. I was willing to pay $33 more for the nicer light, but not $140 more.

6. DIY or Recycle. I saved hundreds, maybe thousands and still got what I wanted by painting my own baseboards and stair moldings. Is it something you can make yourself for less, or buy a simpler version and fix it up? One of my friends fell in love with a $5000 modern light fixture she wanted for her new dining room, so she bought a much cheaper, simple fixture and ordered some crystals from Brazil and created her own for $400. I did the same thing with a ceiling fan I wanted for my French Country bedroom. The antiqued fan with a mini chandelier I wanted was $600. Instead I bought a cheaper off-white fan, antiqued it myself and bought a mini chandelier light kit, all for $180. Maybe you have something already that you can recycle with a little paint. Remember my first entertainment center? It held our tv for years, then I painted it black, replaced the knobs, and it became a wardrobe for a teenage girl’s bedroom. At one point I cut the panels out of the doors and put curtains behind them. Now it’s in my teenage son’s room, where I industrialized it by replacing the curtains with decorative sheet metal from Home Depot.

The cabinet with 9 lives. It started out as Country Pine 30 years ago. Please ignore my son’s stuff stacked on and around it. He happens to be living in Brazil at the moment. Maybe he can get me some crystals.
7. Learn some new skills. You can learn to do almost anything on YouTube in this day and age. Thirteen years ago I wanted a tile backsplash but couldn’t afford the $1000 it was going to cost for the tile and installation. So I learned how to do it online, rented a tile saw and with my husband’s help we installed it ourselves for $180. Learn how to sew straight lines on a sewing machine. Over time you will save thousands making your own custom drapes and throw pillows, and do your research to find home decor fabric online for less.
8. Have a wish list, either in the back of your mind or write it down somewhere. Then when you come across a fantastic deal on something on your list, buy it while it’s a deal. I like to go to yard sales and flea markets, but I have one rule I like to stick to. I only buy something if it’s on my wish list. That way I don’t end up with a garage full of junk I don’t need, or projects I’m never going to finish. Recently I came across a set of 8 solid wood ladder back dining chairs in excellent condition at a yard sale for $150. They just need new upholstery fabric because I don’t like the fabric and I want to paint them because I don’t like the color. I’ve wanted ladder back chairs for a couple years now, but didn’t want to pay $200-300 a piece for them, so they were in the back of my mind as something I would buy one day. In the meantime, I had cheap chairs as place holders until I could afford them. Now for $150, a can of paint, and some fabric I already have stashed away somewhere, I will have a whole new set of good quality, gorgeous chairs because I was willing to wait.

One of my chairs waiting to be refinished. When I get them done I’ll post an “after” shot.
9. Trade with a friend. I know how to sew, I have a friend who does floral design. I sew curtains for her, she helps me with floral arrangements. It’s a win-win.
10. Last but not least - NEVER pay full price for anything. Everything goes on sale eventually. Ok, almost everything. Maybe I already mentioned this one. I probably did. But it’s worth mentioning again. Just wait for it.
Here are a few more of my steals:

An end table I found at a yard sale recently for $15, on it is one of a set of lamps I got on clearance for $20 each. I just need to put a protective finish on the table.

A yard sale mirror I got for $5 twenty years ago. It used to be aged brass. I recycled it by painting it a more updated matte gold color with a $1.25 bottle of acrylic paint, then I turned it sideways.

Accent chairs I got from Pier 1 Imports on clearance when they sold all their inventory and closed their stores last year.

An antique cane chair from a yard sale for $10

Another $5 chair from a yard sale. (And a free cat from my sister.) Obviously the people at the yard sale didn’t realize what a super cool distressed chair this was, and my sister didn’t know what a super cool cat that kitten would become or they wouldn’t have let them go so cheaply. I put this at my kids computer desk. (The chair, not the cat.)

Lastly, a $2500 Serta sectional I got at an outlet store for $480. (Yes, I do know that the room it is currently in has not been put together yet and there are packing boxes and mattresses in the background, but this was such a steal I had to swallow my pride and show you anyway.)
As I finish up this post, which is late because I have been quite busy the last few days, I’ve been thinking. One of the things I have been doing is gathering up some clothes for some children of a Romanian family I recently befriended who are living with relatives and basically have nothing. It kind of makes me rethink my life and all of this concern over light fixtures and tile floors. I’ve decided I’m grateful for my popcorn ceilings. At least I have ceilings. And lights. And floors.

Why Decorate When No One Else Sees?
Today I’m going to share with you a little hallway that comes in from my garage. But first I have to whine. Just a little bit. Due to the fact that I have never had a mudroom, or even a decent back entrance, my six kids have spent their lives coming in through the front door and dropping everything right there - by the door, or in my living room, or on the stairs - depending on where we lived. I would nag at them to put it all away and because they weren’t afraid of me or my nagging, we would have piles of shoes, because of course they never wore the same shoes twice in a row, or put the ones from yesterday or last week away in their closets, and it was a constant irritation. (I have a friend who can just look at her kids and they hop right to it or stop whatever it is they are doing. I was not blessed with that motherly gift and if I tried to give my kids a “look” they would laugh at me.)
I tried in our last house having them come through the garage, and I set up little cubbies for them and it worked for a little while, but because we didn’t have a lot of storage space in the house, the garage became that place and so they had a hard time navigating their way through the obstacle course that was our garage and soon started using the front door anyway. I was going to solve this in our new build by having an awesome mudroom with its own front entrance with little cubbies for their backpacks and shelves for their shoes, but since I didn’t get to build after all, I now have a side entrance into my laundry room with room for some hooks and a bench. But I also have lots of storage in this house and a detached garage for my husbands projects, so we actually get to park in the attached garage, so those little cubbies are actually accessible just before they come in the house from the car.
So just inside the door from my garage I have this little hallway with a closet. It’s a perfect place to hang our keys and to put a bench where we can sit to put on our shoes. Between the side entrance and the garage, we never come in the front door and I never have shoes and backpacks in my living room. Happy day! I came across a blog post that I had saved a while ago where someone had done a super cute entrance and the idea was perfect for this hall.

Inspiration from mindfullygray.com
I fell in love with the color I painted my upstairs bathroom and decided to use it again for the lower half of the wall. Of course I painted all my wood trim white like the rest of the house. Then I stained a 1x6 to match my closet doors and hung it with some hooks for jackets and purses.
About 20 years ago we lived in a house in Germany with a big picture window that looked out onto a field with some fruit trees and hills in the background. It was gorgeous in every season, with the flowering trees in the spring, the fall foliage, and then the sparkling ice hanging from the tree branches in winter. I have pictures from that window from all four seasons and I’ve always wanted to do something with them so I framed them and hung them above the hooks. They aren’t professional photographs by any means, and they are from the days before digital when you took a picture and then six months later took your film in to be developed and crossed your fingers that some of the pictures turned out ok, but they are meaningful to us and they are hanging in a back hallway so they work here. In one of them my two oldest girls are standing in the field when they were little, which makes it even more nostalgic.

Here you can see my “four seasons” photographs. It’s a narrow space so it was hard to get a good view. I also found a rustic bench and I used dark bronze coat and key hooks.


I decided to go a little more rustic here since this is a back entry into the garage. I took down the old generic light fixture and added a dark bronze lantern to match the finish on the hooks. It just felt like a great place for a lantern. My lower wall is Benjamin Moore’s Dartsmouth Green 691, and the rest of the walls are Ballet White OC-9. Ballet White is a light beige with a green undertone and a high LRV so it brightens things up and goes really well with all the green in this room. This may not be a highly visible room in my house, but it’s now a little bright spot that brings some joy as I come and go throughout my day.

Rugs - Who needs ‘em?
Growing up in the 70’s and 80’s with wall to wall carpet, I found that living in base housing and European houses without carpet, I really missed it. Vacuuming is much less labor intensive than mopping and requires less drying time. Besides, all that tile was cold and ugly and slippery. My oldest daughter was 15 months old and still not walking. We went home for a visit and she started walking the first day home. Apparently my little 5x8 area rug was not enough real estate for her to practice on.
13 years ago we were getting ready to leave Germany and although I left there under protest, kicking and screaming the whole way, there were some things I was looking forward to in The States. One of those was real, honest to goodness closets. The other was carpet. We bought our first house and it had wall to wall carpet. I was so excited. We lived there six months and I tore it all out. I hated it.
After 17 years of living without it, I realized that I liked being able to thoroughly clean the daily grime off my floors instead of it getting ground into the floor upholstery where the vacuum picks up some of it and the rest gets beaten into the pad underneath with a beater bar. Then you get out the shampooer every few months and turn it into sludge. I did not, however, replace it with cold, ugly tile. We went with a wood laminate, and later as technology advanced, water-proof wood plank luxury vinyl.
So in this house I have hardwood throughout, except for a couple bedrooms and a hall upstairs. That carpet is about to get an eviction notice as soon as I can afford to replace it with matching hardwood. But all these hard floors come with a need for area rugs. And yes, you heard me right, we NEED area rugs. Here’s why:
1 - Hard floors are loud and echoey (Is echoey a word? I may have just made it up). Rugs absorb sound and cut down on the noise. We lived in a duplex once with tile throughout and we could hear every argument, tv show, and sneeze through our bedroom wall because without rugs our bedrooms acted as echo chambers.
2 - Hard floors are hard and cold (we already mentioned that).
3 - A rug can be used to unify a color scheme.

Here’s a room from a past life where I used a rug to bring a blue gray sectional and a teal love seat together. Both colors are found in the rug so the furniture gets along. (Ignore the ugly lampshade. What was I thinking?!)
4 - Rugs help to define a space. Without a rug, furniture can appear disjointed and unconnected. Here are some examples:

See how in the first picture the furniture just seems to float in the room? It’s a room with some furniture scattered around it, where in the second picture the rug brings it together into an actual seating area. You can also see how the colors in the rug unify the colors of the furniture, tying the blue throw pillows in with the bits of blue from the rug and giving them something to relate to.


From rugsdirect.com
In this dining room the rug anchors and defines the dining area. It also adds some color to an otherwise neutral room.
Rugs are one of the hardest things for me to choose. There are so many styles, colors, materials, price ranges, the choices are endless. But I have learned some things over the years, from experience, but also from the materials class I had to take for my degree, so I’ll pass that wisdom on. My kids may read this and most likely disregard it, thinking they know better and make some of the same mistakes, but maybe someone out there will read this and learn from it and the effort I put into it will be worth it.
A) If you find a beautiful rug that you love, it can be like artwork and used as a starting point for a color palette for your room. Just keep in mind that if you have a very colorful rug, or one with lots of pattern, it is now the boss and you have to be choosy about the other colors and patterns in the room - unless you are the gifted, artsy, bohemian type who can throw it all together and make it work.

Here’s an example of a rug that makes a statement and is the centerpiece of the room. Everything else is secondary, and the colors are pulled from the rug.
B) A rug can also be neutral and fade into the background, just quietly doing its job of defining the space, warming your feet, and dampening noise. The rugs in my living room in my last blog post are a perfect example of that.
C) Wool is the most durable carpet fiber there is. Nothing can beat the way it absorbs dyes and color and it has been used in rugs for thousands of years. Wool rugs are soft but they shed at first. They will eventually stop, but they are not naturally stain resistant because of that wonderful way in which they absorb colors. They are also more expensive than rugs made with synthetic fibers.
D) Nylon is considered a premium synthetic fiber, as it is stain resistant, crush resistant, all the resistants except fade resistant. However, I had a nylon rug once that did not meet up to those expectations. It looked terrible within a year, except under the coffee table. It was crushed flat. I have learned since then to use a rug pad and vacuum with the brush turned off and my rugs look nicer much longer.
E) Polyester rugs tend to get matted in high traffic areas fairly quickly. I’ve learned this from my materials class and from experience. Unfortunately, my class came after my experience. I avoid polyester rugs.
F) My favorite synthetic fiber is polypropylene. It seems to be naturally stain resistant and durable, but look for rugs that are dense or they will crush. I bought some Turkish rugs while we were in Germany and used them for years. They still looked brand new. Unfortunately when my mother-in-law came to live with us so did her dog. It’s amazing the amount of damage one little dog can do to a rug.
G) Unless you are independently wealthy, expensive rugs may not be your best option. I’ve learned some things the hard way. Cats will snag a sculptured rug, those little loops are just too tempting to leave alone, and then to add insult to injury your new puppy will chew up the snags. A flat weave cotton rug may not be colorfast, so even if it is under your bed where there isn’t much traffic, when your adult son walks into your bedroom carrying a half-frozen 20lb turkey dripping with condensation, the colors will run. Then when your husband inevitably drops his 32oz diet coke off of his nightstand, there is no way to clean it up without the blue dye coloring all the white fibers. Finally, a jute rug cannot be washed on gentle and cold and hung up to dry, it will still shrink. The lesson here is don’t have pets. Or kids. Or a husband. If you still insist on having these things, less expensive rugs are the way to go. There will be a lot less crying when they have to be replaced.

My First Reveal
So far I’ve talked about paint and wood trim, and what I should do about all the wood in my 90’s house. I gave y’all a peek at my stairs and my fireplace. I thought today I’d let you see what it all adds up to.
First though, I thought I should clarify what I said last week about paint colors and wood trim. I was talking to a friend who read my blog post and I might have implied that only blues and greens look good with wood windows and doors. I realize now I should choose my words more carefully. Oops. Lesson learned.
There are many warm colors that could go with your wood trim, I just happen to be decorating with blues at the moment. If you happen to have wood trim you aren’t doomed to decorating your whole house with cool colors forever. That could be really bad if you hated blue. The trick with warm colors is to make sure there is enough contrast between the wall and the trim. In other words, if you have orangey wood, dark orange walls might not be your best choice, and since it’s subjective, maybe you wholeheartedly disagree with me, even though I’m right. Same principle applies if you have yellowy wood trim. And neither one of those would go with a beige with pink undertones, the wall would look dirty, and then you’d never be able to let your mother-in-law visit. Here’s another great post on picking colors to go with your wood trim by Maria Killam, my go to expert on paint colors.
Now, on to the fun stuff. If you remember, I painted the fireplace and parts of the staircase white. I also painted the baseboards and door frames. I had the all the beige walls painted before I moved in to help brighten things up and reflect more light. I also took down the dated ceiling fan in the living room and put up a new light fixture since the only light came from the shiny brass can lights by the fireplace, which I also updated with flat white ones.
Here’s what it looked like before. (These pictures have the previous owners furniture in them, and were taken by a professional photographer who brought in a bunch of lights, making it appear much brighter than it really was. The walls almost appear white instead of beige in these pictures.)
Living Room Before

Another before picture from a different viewpoint
Here is what it looks like today with a little bit of paint and a new light fixture (and my furniture, of course). I’m really liking the mix of white and wood. I just can’t decide whether to paint my window trim. I painted my door trim and I love it. You can see one the french doors with white trim in the background of the second picture.

Living Room After

Another View

I love this room. The colors are soft and serene and the room is bright and airy. We use this as our formal living room and music room so it is always clean for guests, or just a quiet place to relax and read a book - unless someone is practicing or my grandson has his little friends over, of course.
Now let’s talk about how this room tells a story. Nothing in this room is arbitrary. I started with the painting that I love, which I’ve had for a long time, and dictated my color palette. The chairs were a bargain when Pier 1 closed their brick and mortar stores. The colors went perfectly with my painting. The sofa was a splurge. Since this is my formal living room I felt justified in spending a little extra on one with some style that would last a long time and was a fantastic color. I collected the pillows one at a time as I came upon them until I had the perfect mix for the room. I decided to go pretty subtle for the rugs, going with a blue gray to go with my blue gray walls and sofa. This is my foundation.
The piano is here because five of my six kids and I play. The cabinet holds music. The things on the cabinet and tables all came from places we visited or are family heirlooms. There’s a family portrait on the wall, and the other wall is a painting of the building where we were married. On the fireplace is an anniversary clock that belonged to my parents. The vase came from a trip I took to Poland years ago when we lived overseas, my grandson is in the picture frame, and the mirror I bought for $5 at a yard sale when we were young and poor. It used to be an ugly brass color, so I brightened it up with some paint to go with the fresh new gold finishes. I picked up some lamps on clearance, and waited for the coffee table to go on sale and voila, my living room is complete. Like I said on my home page, each piece is carefully chosen and curated, telling a story, not something that came from a furniture showroom - and see what you can learn about me just by visiting my living room.
So Many Colors, So Little Time
Wow, week three snuck up on me! Let’s talk about paint. I knew I was going to want the new house painted and painting it while it’s empty is the way to do it. No heavy lifting, no paint dripping down on my duvet, and best of all - no kids touching the freshly painted walls while they dry.
I scheduled the painters to be there as soon as we closed and had the key in hand so that they would be done as soon as possible and we could start moving in. I had them start on the main floor so I could come in and start painting my baseboards and it could dry before my heavy furniture came in and covered them up. I knew that once they had something in front of them it was highly unlikely that I would ever paint it.
In an ideal world it’s best to paint your walls to go with your décor. I had some idea of how I was going to decorate each room so I picked paint colors based on a few things – the amount of light each room got, the direction the room faced, the colors of the décor, the colors of the adjoining rooms, and the wood windows and doors.
First let’s talk about light. I love brightly lit rooms with lots of natural daylight. This house has a lot of windows, but the beige walls in combination with the oak floors and woodwork just seemed to dampen it. Even getting decent “before” pictures was difficult because they all came out dark. Each paint color comes with a number called a LRV, which stands for “Light Reflectance Value.” This is the amount of light the color will reflect. Instead of boring you with a dissertation on this, here is a great blog post by Kylie Mawdsley on this:

Another factor I took into account was the direction my house faced. My living room and family room both face north, which takes advantage of the fantastic views behind the house, but is not so good for the light as northern exposures never get direct sunlight. In addition the light coming from a northern window will always be a little bit colder and bluer than the light from a south facing window, so I did take this into account when choosing the colors for those rooms. I wanted a very subtle blue gray, so I picked one with a touch of green to it so that when the blue light from the north hits the walls they aren’t frigid. Brrr!
I knew that my wood windows and doors would look best with colors that had some blue or green undertones to balance the red tones in the wood. For fun, I went all out with a darker green in my upstairs bathroom because I’m not planning to remodel it anytime soon. I wanted a paint color that would be enhanced by the wood vanity and mirror, along with all the wood trim, and since it’s a bathroom I don’t have to live in I could have more fun with a darker color. There are thousands of colors to choose from, and narrowing it down can be a bit overwhelming. I started with this blog post by Cyndy Aldred called:
What are the best paint colors out there for wood trim and flooring?
This gave me a jumping off point and from there I was able to expand on my own and find other colors I liked, checking the LRV on each one, of course.
Finally, the only room I painted white was the master bedroom. White is not as forgiving as one would think and can’t reflect light that isn’t there to begin with. However, in this room, I planned to have white bedding, giving the white walls something to relate to and there is a large window. I also chose not to paint the trim in this room because it has beautiful crown molding and with the white walls the wood trim seems to fit the aesthetic. But more on that later.
So what were my final choices? Here they are:


I came into the house the first day after the painters had been there, feeling a little apprehensive because it’s always scary to see how paint will look when it’s all over the walls, like the time I painted my dining room a soft wheat color and when I got it on the walls it was almost a sunflower yellow. Words cannot describe how happy I was when I walked in. The whole house was lighter and brighter. Painting the fireplace and baseboards made it even better.

Here you can see the lighting in my living room with the old paint color. The image was so dark I had to brighten it with photo shop just so we could see the room.

Here it is after it has been painted with Benjamin Moore Quiet Moments. I have also painted the fireplace and one of the baseboards so they could deliver my piano. I really didn’t want to climb behind the piano to paint, or worse yet have to move a piano to paint. It is sooo much brighter. The paint reflects so much light I didn’t even have to photoshop the photo to see the room. You can see the Ballet White in the arch and the hall behind it.
The rest of the rooms turned out just as bright and cheery, but I’m saving them for later posts. Can’t give away all my secrets at once!

Wood Trim - What Stays, What Goes?
So you’ve moved into a house full of wood trim. Let’s assume it’s not a historic craftsman or victorian home, one built more recently and you want to bring it into this century. Should you paint? Personally I feel like all that wood makes a house feel dark. Some people consider it a high crime to paint over solid wood. To be fair, it is hard to undo. When we looked at our house and we were making the decision whether to put in an offer, one of my biggest sticking points was all that stained wood. It’s a well built, good quality home - all brick, oak floors, solid wood doors, wood windows, oak trim, oak staircase, solid wood cabinets - but all that wood felt oppressive and a little overwhelming to me. The doors are beautiful, painting those would feel like a crime, and painting the windows seemed out of the question - raising and lowering them would just cause the paint to scrape off and peel. I had to decide if I could change it enough, without having to completely renovate it, to be happy with it - before we made an offer. I spent far too long just living with things and I didn’t want to spend the rest of my life and a small fortune on a house I had to tolerate.


I knew I had to paint the baseboards, but would that be enough, and how would it look? I went to the internet and searched for pictures of interiors with wood doors and white trim. I was pleasantly surprised, and even a little excited. I found beautiful interiors full of white trim framing wood doors and windows and the contrast is beautiful, the wood adding warmth to the room.

This is a beautiful example of how to mix white trim and wood stain. Saved from yaydecor.wordpress.com. Read Tiffany Brook’s post here for more ideas on what to do with oak trim.


Saved from freshouz.com. You can see more stained doors and with white trim on Carey Davalos’ post here.
I got excited. I knew that not only could I live with my wood doors and windows, but they would be a beautiful contrast to my white trim and cabinets. Did I mention that my husband insisted that since I didn’t get to build my dream house I should have the white shaker cabinets and quartz countertops I’d been dreaming of in the new house? Yes, he did - and not only will I have the perfect house someday but I have the perfect man. And that was it. I made my decision and the rest is history… and a little work on my part.
I started with the fireplace, you can see that on my projects page, or read about in last week’s blog post. This week I’ll give you a sneak peek at the staircase. I decided to paint the balusters, risers, and stringers white, but leave the handrail, treads, and newel oak. My staircase is on one end of the living room, and between that and the fireplace this room is becoming one of my favorites.


This project is a little tedious and I used a lot of painter’s tape to make sure that I didn’t get paint on the things that are supposed to stay wood. Again I used Zinsser Cover Stain oil-based primer and then painted it with Behr Oil-base Semi-gloss Enamel in Benjamin Moore’s Decorator’s White. Some day I hope to get that horrid carpet off the stairs but that will have to wait a little since there aren’t beautiful wood treads going all the way across. It won’t be an easy or cheap fix. Here’s the (mostly) finished product. The lighting is a little different and I pushed pause on the railing upstairs so I could focus on painting the trim on the main floor. I wish I’d finished it and taken a picture before we filled the living room with furniture. It makes the room just a little brighter and updates the space.


To Paint or not to Paint
It all began five years ago when we bought three acres on the edge of town. We were going to build our dream house and live there till we die. No more stupid layouts, no more tiny closets - or worse lack of closets, no more dark rooms, tiny dining rooms, ugly tile, steep staircases, basement laundry rooms, nasty carpet, 7 ft. ceilings, backpacks in my living room… and best of all, no more packing or moving. Ever. Again.
I spent 29 years collecting ideas - things I liked, things I didn’t, things that worked, and things that didn’t. I clipped pictures from magazines and as technology advanced, saved more ideas in folders on my computer. Eventually I discovered Pinterest - what a glorious invention - and I started pinning and pinning, also saving ideas on Houzz, and I read blogs. I designed it myself, inside and out, refining it over the years. I learned about construction, how to draft, and I drew up the plans. I put it in my TapGlance app and arranged the furniture and hung curtains so I could walk through it in 3D and admire it. I lived in it virtually for years, tweaking it here and there. I finally had the plans for the perfect house. We planted trees, we had a contractor, we had sewer, we were getting ready to put in a driveway.
But things don’t always work out exactly like we plan, do they? Instead of getting to build my dream house, we bought a house. I won’t bore everyone with the details. It’s a beautiful house, with a great layout, and I only had to sacrifice a few things - my mudroom separate from the laundry room, a main floor guest room, an office for my husband in the house, 9’ ceilings, and my walk-in pantry. Instead my mudroom is in the laundry room, my guest room is upstairs, we built Karry’s office in the heated detached garage, and I’ll just turn an extra half-bath in the laundry room into an extra pantry. In exchange I got the open layout, main floor laundry room, walk-in closets, master bathroom, and fenced in yard I’ve never had. And bonus - an awesome yard with mature trees and all the landscaping already done for me.

What’s the catch, you say? Wood. And shiny brass. Everywhere. This house was built in 1992 and is firmly stuck in the 90’s. Wood-stained trim, wood-stained doors and windows, oak fireplace mantels, oak banisters and balusters, oak floors, and oak kitchen cabinets, 90’s style. My dreams of light, open spaces with 9’ foot ceilings, white windows, white trim and doors, white french doors, white fireplace surrounds, a white staircase, and light wood floors, dashed. I’m now immersed in wood and 8’ popcorn ceilings.
Before we moved in the first thing I did was paint. I guess I should say I hired someone to paint. After painting our last house so we could sell it, I vowed never to pick up another paintbrush - or roller. I got rid of the beige walls and brightened up the interior - I’ll save paint colors for another post. I then planned out what to paint white and what to leave wood. Then I broke my vow never to pick up another paintbrush and painted the fireplace. I could feel my father-in-law turning over in his grave with every brush stroke. I could also feel the judgment coming from my husband and other family members when I announced that I was going to paint over a solid oak fireplace mantel. I called a friend who had done the same thing for some emotional support and went for it.
Said friend also mentioned that she wished she had used oil-based paint instead of latex because she was painting over wood stain and she had trouble with scuffing and peeling. I took her advice and started with Zinsser Cover Stain oil-based primer. This gave me a base coat for the paint to stick to without having to sand it first. Then I painted it with Behr Oil-base Semi-gloss Enamel in Benjamin Moore’s Decorator’s White. Home Depot carries it. I had to buy it in quart size because of restrictions in the state where I live. Behr is always my go-to paint just because it has great coverage and I don’t have to paint a second coat. It costs more per gallon, but I spend less in the end. I sometimes have to do a few touch ups, but never a full second coat, even when covering red paint with a light color. The oil-based paint takes about a week to cure, but it hardens into a nice hard finish that is easy to clean.

Before

After
The white mantel against the brick of the fireplace really pops, and completely changes the room. It’s like someone turned on the lights. My husband and mom both admitted it was the right thing to do. Unfortunately I can’t ask my father-in-law for his opinion.